
Learning Manual Mode- Aperture, Shutter Speed, and ISO Tips
Lately, I’ve had many questions about my photography gear and technique, so I thought I’d share some tips here on the blog. I am not an expert, but I think I can share a few tips to get you started. I do not have the latest and greatest camera in my bag. If you see good photos on my blog it not due to my equipment, it is because I take control of my camera and tell it what I want it to do, rather than letting it choose what it thinks is best.

If you want to take great pictures, you need to learn to shoot in manual mode! It really isn’t as hard as most people think, a little practice and you will soon wonder why you were nervous.
So, take a deep breath and switch that dial from the little green box to the M!
The first thing you need to take control over is the camera’s focus point. When shooting portrait quality pictures you want the crisp focus to fall on your subject’s eyes. If you let the camera choose it’s focus point, the focus is likely to fall in the wrong place. There are several ways to deal with focus points- you can toggle between the points manually, alternately you can use the center focus point to focus on the eye, press the shutter halfway down and then recompose your shot. While you are first learning manual mode, I recommend neither of these normal methods– get good at manual settings and then tackle choosing your focusing method and learning to get a great composition in camera.
Instead, set your camera to focus on the center point. Always put that point on your subject’s eye when shooting. Make sure you step back and leave extra room in your photo for cropping, since by using this method you will need to crop to a more pleasing composition on your computer later. With today’s high megapixel count cameras you have plenty of detail to use this method and crop in post processing rather than in camera.
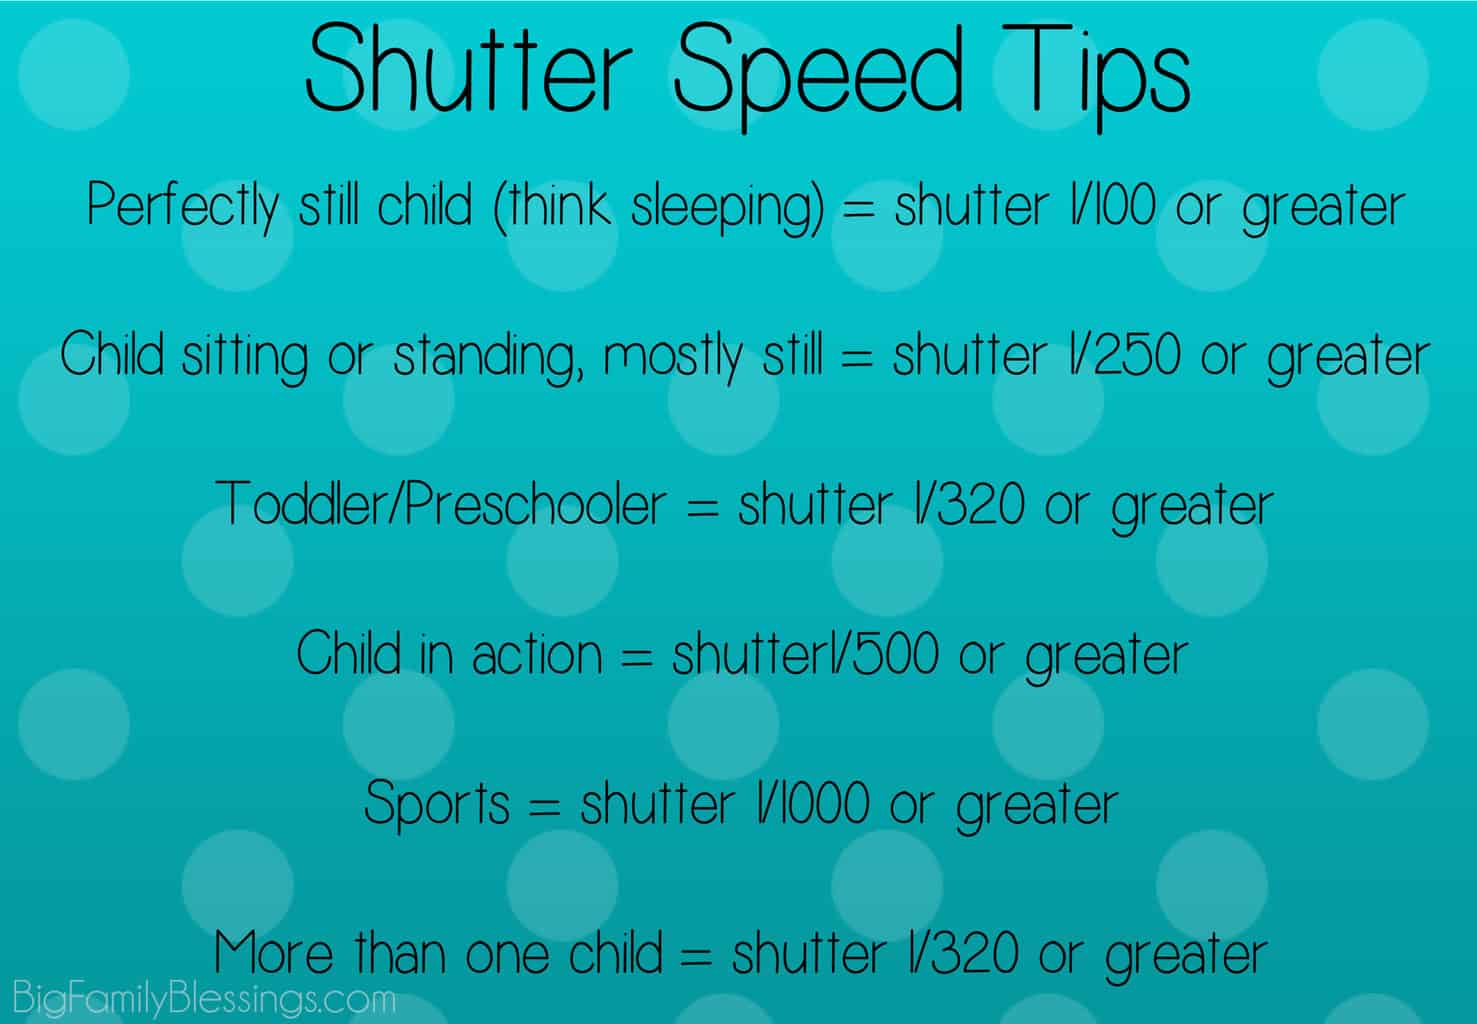
Now, choose your shutter speed
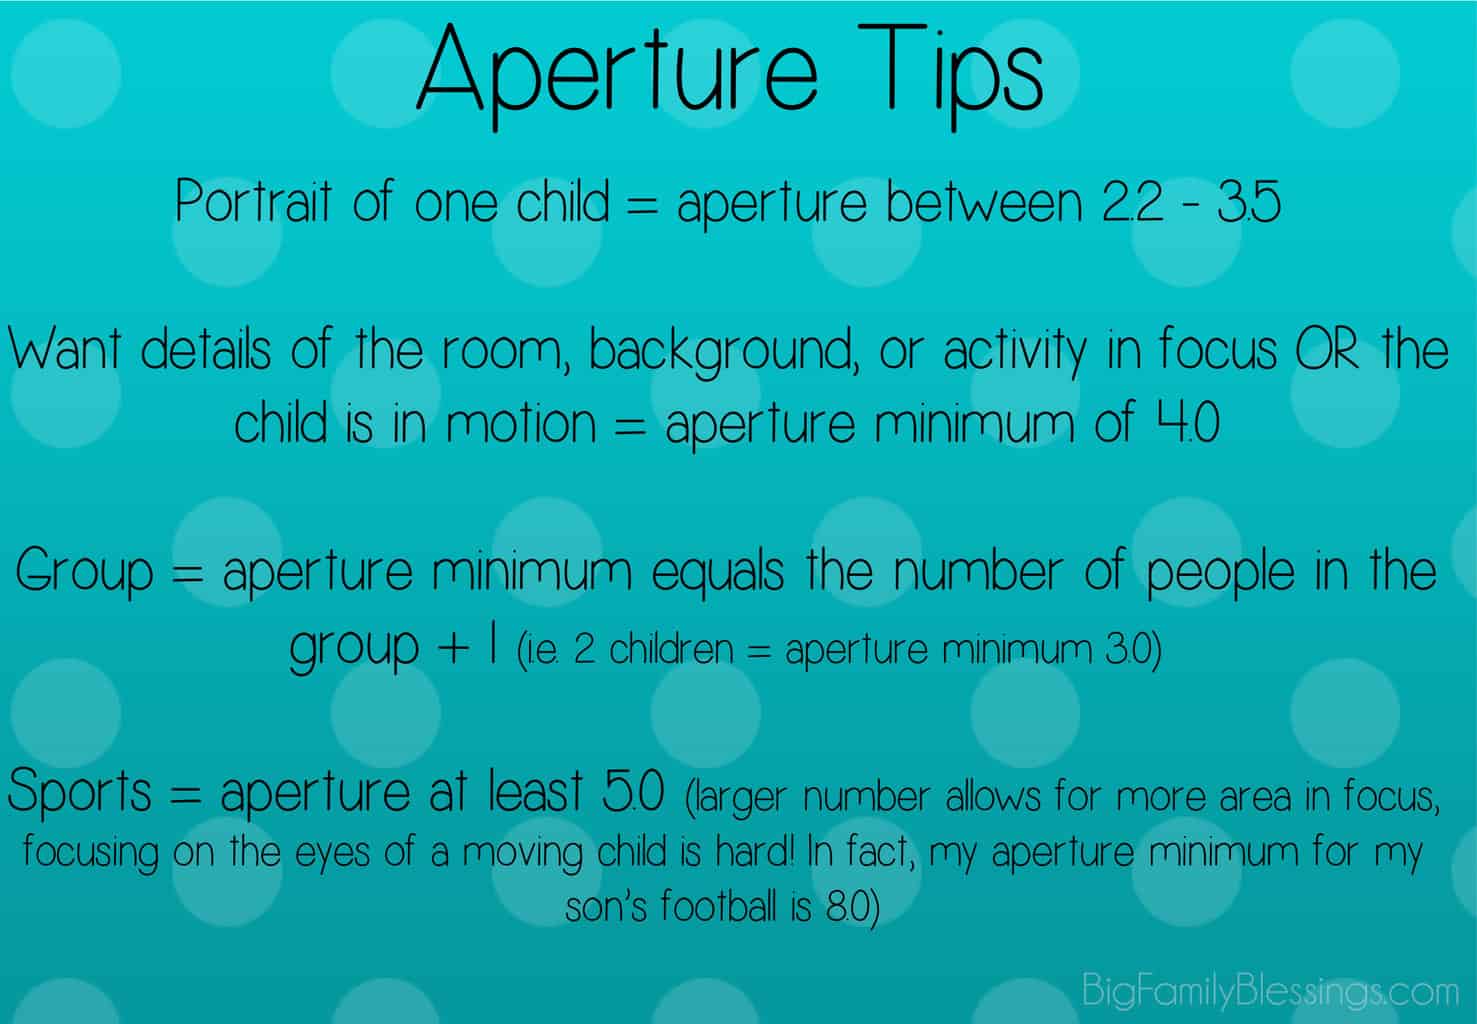
Next, choose your aperture
The aperture setting determines how much of your photo is in focus. The smaller the number, the less focus in the photo. If you love the look of a creamy, blurred background in a portrait, this setting is where that look comes from.
Finally, choose your ISO
Now that you’ve chosen shutter speed and aperture, all that is left is your ISO. Point your camera at your subject and press the shutter half way down. The meter in your viewfinder will light up to show you the current exposure.
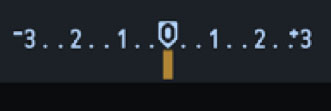
Your camera says a properly exposed image should find that arrow resting on the zero. If the arrow is in the negative numbers your photo is underexposed (too dark) and you need to make the ISO a larger number. If the arrow is above zero your photo is overexposed (too bright) and you need to make the ISO smaller.
*On the rare occasion that my ISO is already as small as it will go, and my meter still says my image is overexposed I usually increase my shutter speed until the meter is showing a properly exposed image.
And that’s it! Once you have set those 3 values- shutter, aperture, and ISO- start taking photos!
For me, ISO is the easiest setting to change while in the middle of shooting my camera. You can change ISO without changing the look of your photo (except for adding a bit of noise, but that is easy to fix in post processing) whereas changing shutter speed or aperture can change both the look of your photo and can more quickly create an image that is unacceptable due to blur or focus issues.
For example, when I shoot my son’s football games I set my shutter to 1/1000 and my aperture to 8.0. When I shoot him running up the field towards the bright sun I can quickly change my ISO to a lower number (such as ISO 100), then when he is on the other side of the field with less bright sun I can bump the ISO up (usually around ISO 400). Sometimes the clouds are rolling back and forth over the sun and I may need to bump the ISO up to ISO 800 when there is cloud cover and quickly change back lower as they roll away. All this time, I have not missed any shots due to me (or my camera on auto) choosing a shutter speed too slow for football, or an aperture that won’t catch the details. After that initial set up of choosing the best shutter speed and aperture for the situation and the look I want in my photos, I don’t have to worry about that again for the entire game.
Exception to the Rules
Now, that I’ve said all this and told you to make the leap to manual mode, I have an exception. Sometimes capturing a fleeting memory is the most important thing. You can and should take a snapshot to capture a memory rather than miss the moment.
If your child stands to walk for the first time, by all means grab that camera and turn it to auto! But, I encourage you to switch back to manual after you capture that ‘safe’ shot. If you don’t get a great shot on manual you still have the safe one, but I bet you will be surprised at how quickly you learn to take better photos than the auto setting.
When I started learning manual mode I missed capturing memories. I wouldn’t get my camera out in difficult lighting situations or I would put my camera away when I got flustered trying to take photos during a busy party. Looking back I wish I had given myself permission to switch to auto mode for capturing snapshots even while striving to learn to take better photos.
I hope this oversimplified explanation of shutter speed, aperture and ISO will help you take that leap into Auto mode!


One Comment