Nativity Scene Luminary

Make this beautiful luminary Nativity craft to enjoy this Christmas season.
As a child Christmas luminaries were a big part of our neighborhood Christmas. On a designated night every home would line their section of street with glowing luminaries, and the children would be pulled caroling through the neighborhood on a hayride. It was a magical night.
Back then, our luminaries were simply white lunch bags with sand and candles. Imagine if we’d had these gorgeous Nativity Scene Luminaries! 
Grab your kids, some art supplies and get crafting! Whether you light your front porch or your kitchen table, these nativity luminaries are gorgeous!
If you use a batter powered candle you can even use one in your child’s room as a night light during the Christmas season!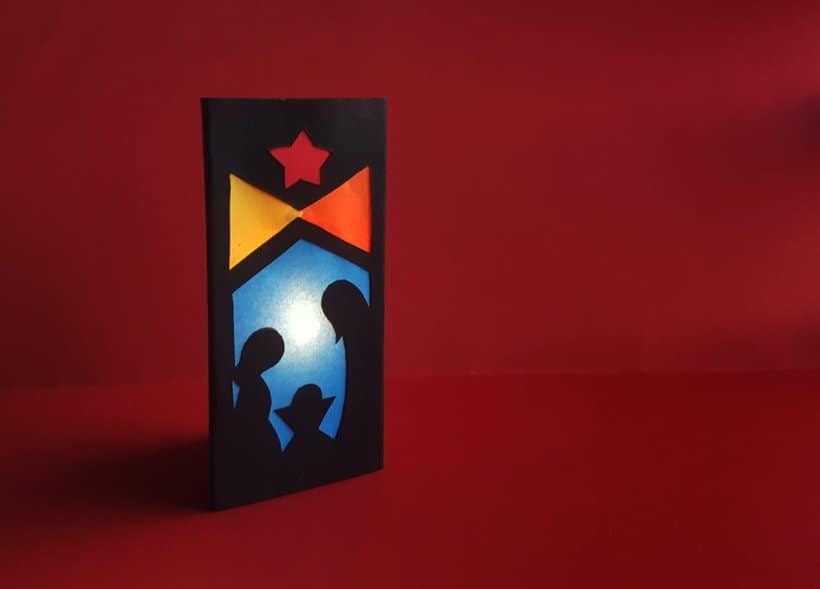
Make your own DIY Nativity Luminary
Supplies:
- Craft papers in 3 or 4 different colors
- Black cardstock paper
- Pencil or pen – for tracing the template
- Scissors
- X-acto knife
Directions:
Print and cut out the luminary template. Determine the size for your luminary by tracing the height of the luminary template in the middle of a piece of black cardstock. The black cardstock will need to be 3 times the width of the luminary template plus about half an inch.
Cut out this rectangle, if your cardstock is larger than needed. Fold the black cardstock into thirds, leaving the half inch out of the folds. Now make diagonal cuts on the corners of that extra half inch section.
Trace the pattern on the middle section of the cardstock.
Use an x-acto knife to cut out the pattern from the cardstock.
Keeping the silhouette areas (see template to be clear) intact, use the x-acto knife to cut out the white parts from the cardstock. 
Cut out all white parts neatly to create the Nativity silhouette art on the cardstock.
Measure the size of the 3 parts of the silhouette art and cut out 3 or 4 different colored craft papers for each part. I’m using blue for the scene, red for the star, yellow and orange for the triangular area.
Apply craft glue all over the silhouetted art.
Carefully place the cut out colored craft papers on the glued parts carefully. Make sure to cover the silhouetted art on all sides.
When you finish adding the papers turn the cardstock to the other side. This will be the front side of the luminary.
Fold the cardstock along the 3 even parts.
Apply glue on the half inch section and attach it with the cardstock’s other open end to close the sides of the luminary.
Place the luminary on a flat surface and then put an LED candle inside it, through its top open end. Turn the light on and enjoy the nativity scene!
Merry Christmas!
If you love nativity themed crafts be sure to check out this post too: